Conversation Flow
Control how conversations start, how you collect user details, which smart features are available, and when to hand off to a live agent. Navigate to Settings → Conversation Flow, then expand each sub-section below to configure its options:
- Initial Interaction
- Contact Capture
- Smart Response Options
- User Input & Feedback
- Live Chat Settings
Be sure to click Save Changes at the bottom of each panel after making updates.
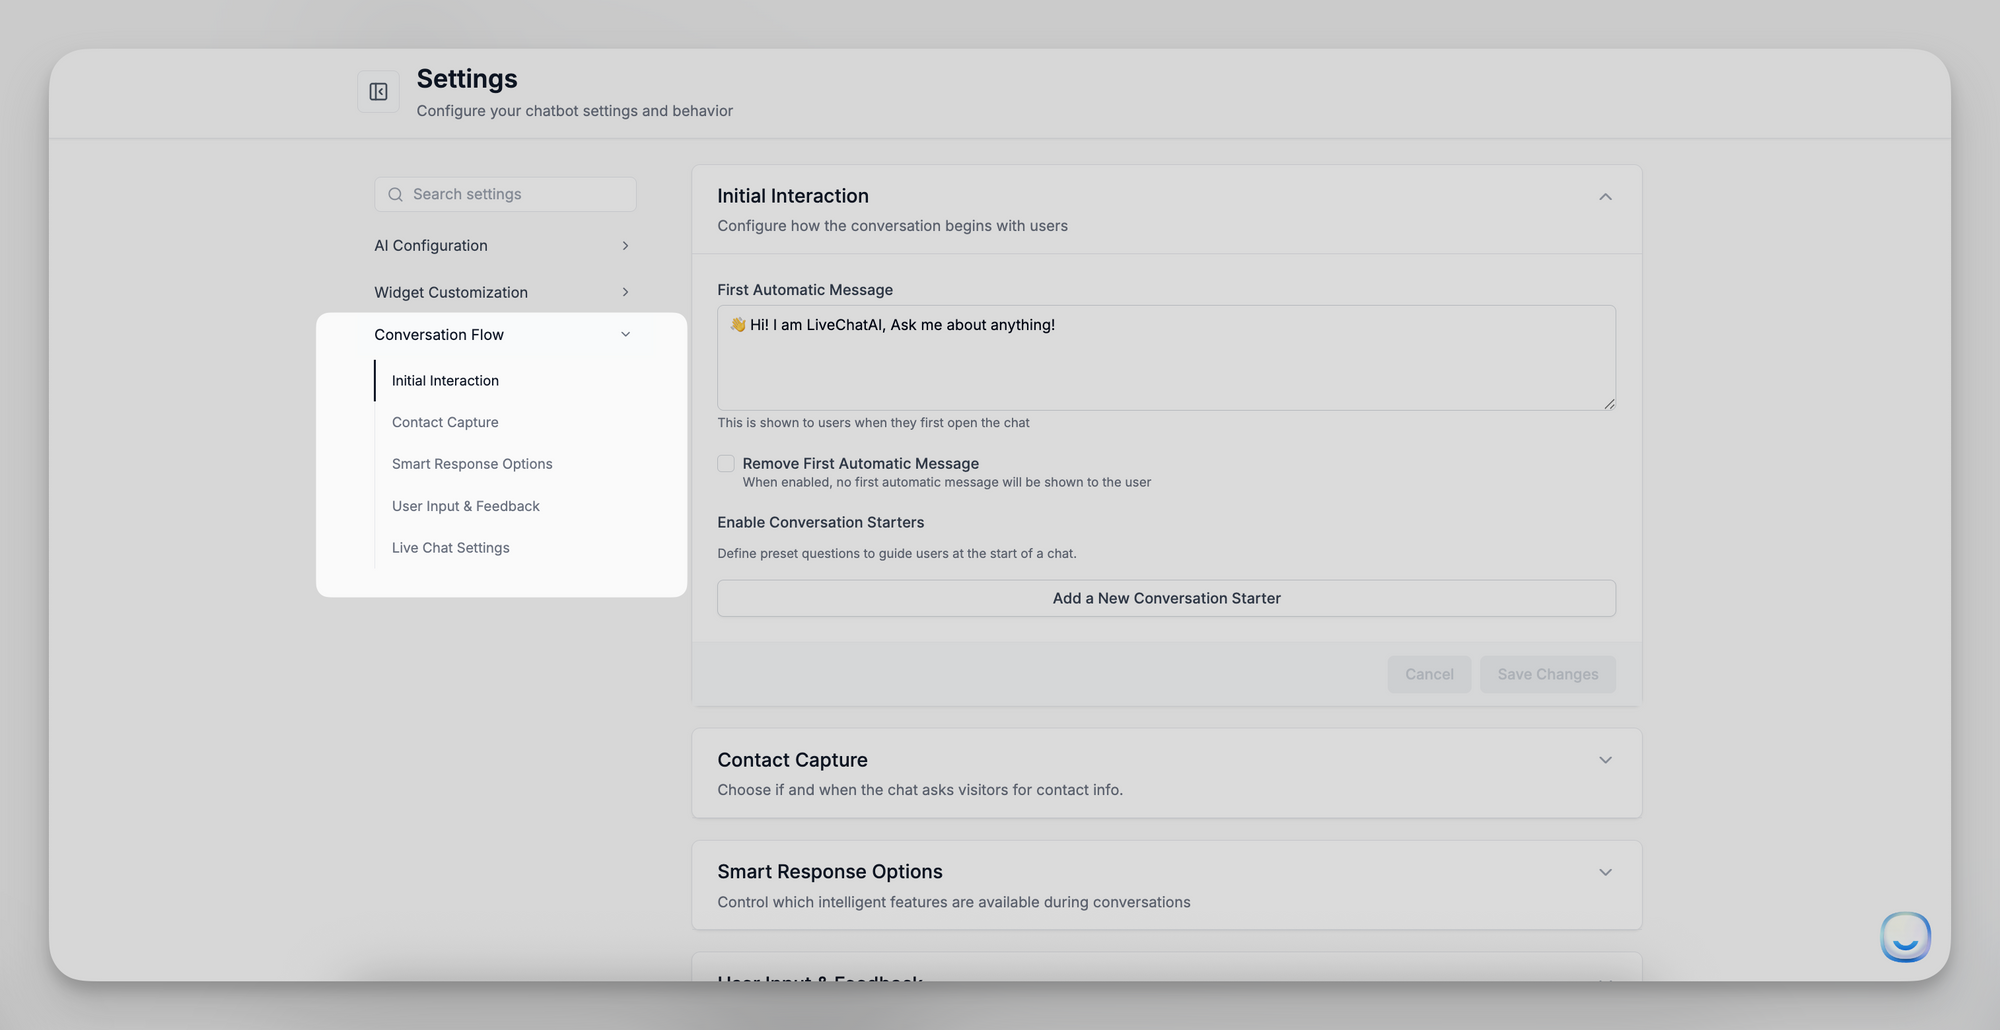
Initial Interaction
Customize the first messages and conversation starters that greet visitors as soon as they open the chat.
First Automatic Message
- Field: A rich-text box where you can add plain text first messages.
- Purpose: Displayed automatically when a user first opens the chat window. Use it to welcome visitors, introduce your brand, or highlight top support options (e.g., “Hey there! 👋 How can we improve your experience today?”).
- Remove First Automatic Message:
- Checkbox: When checked, no automatic greeting will be shown. The chatbot waits for the user’s first message.
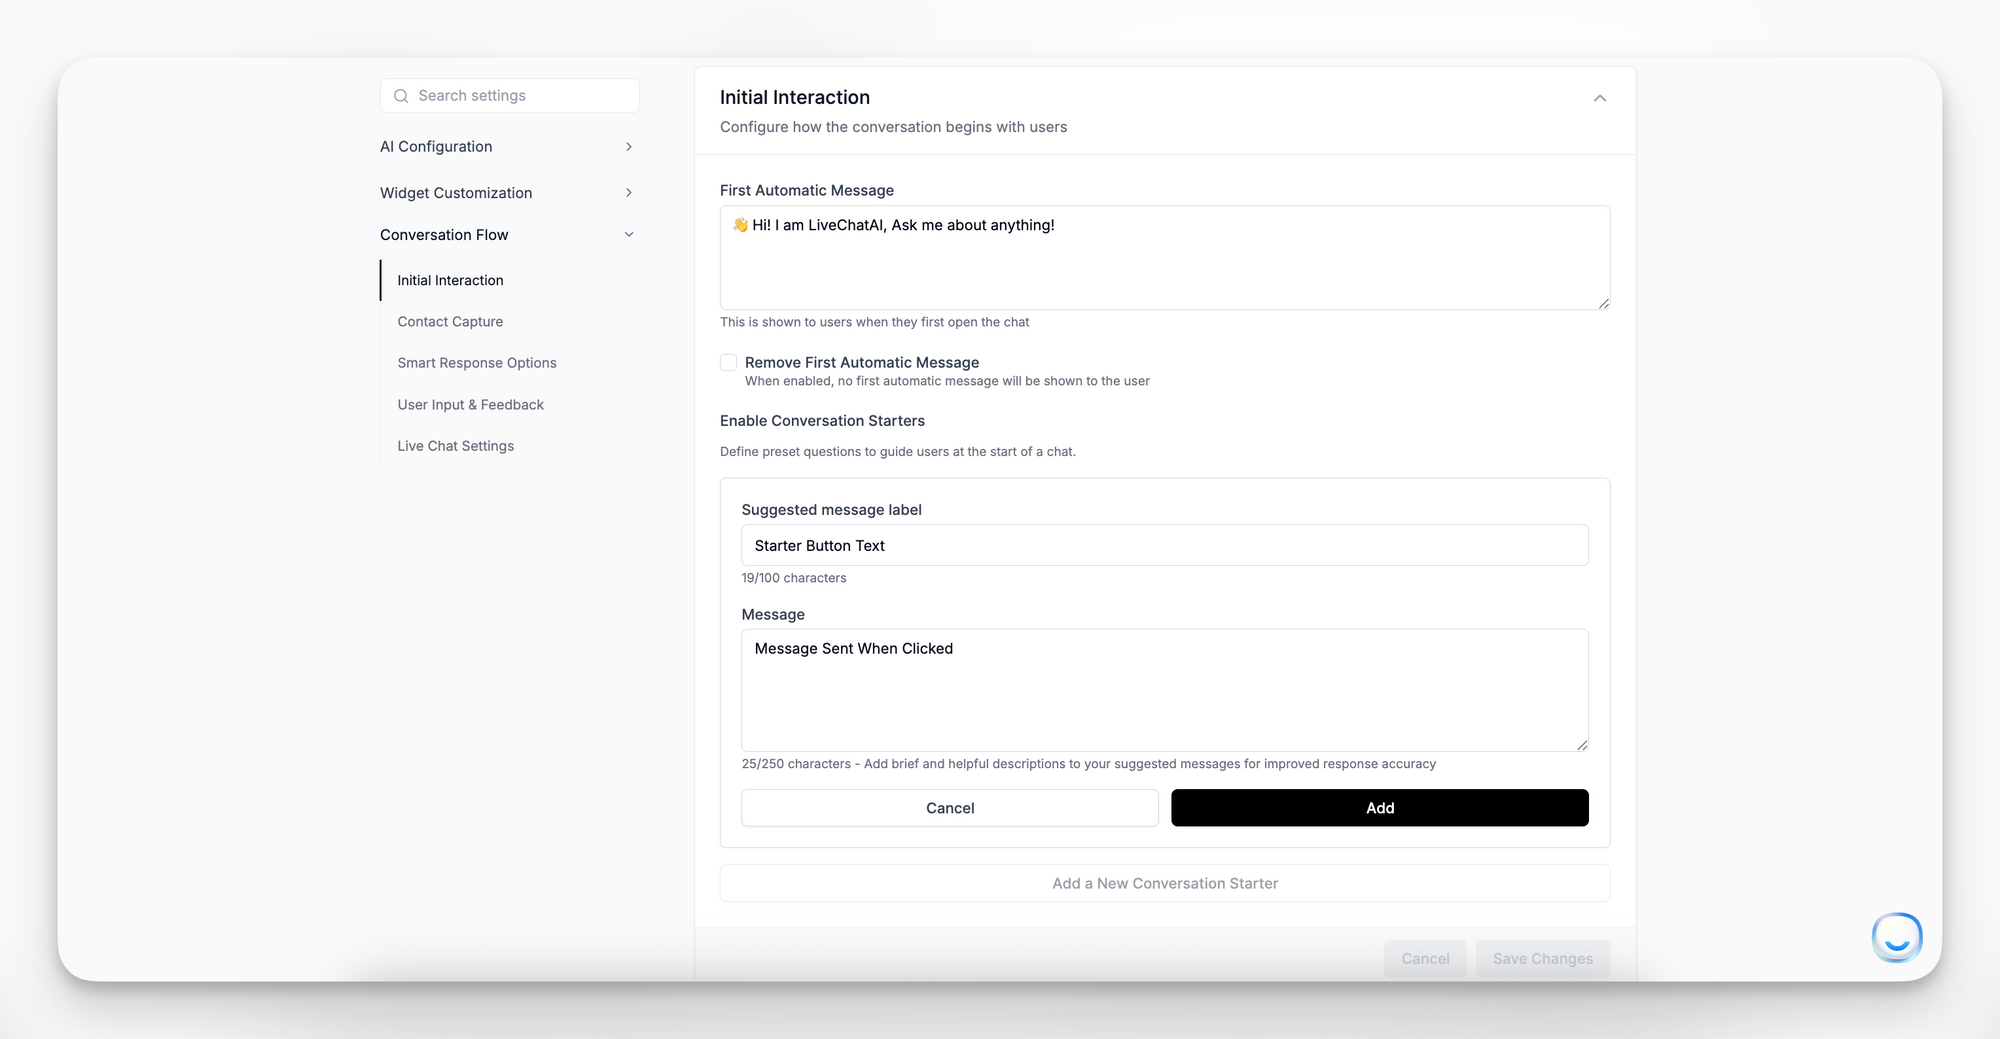
Enable Conversation Starters
- Toggle: Controls whether preset “quick-start” buttons appear beneath the greeting.
- How to Add a Starter:
- Click Add a New Conversation Starter.
- Enter the Button Text (e.g., “Book a Demo?”) and the User Reply that the bot sends when clicked (e.g., “I’d like to book a demo”).
- Click Save.
- Edit or Delete: Click Edit to modify the text or 🗑️ Delete to remove it.
Best Practice: Keep each starter concise (5–6 words) and action-oriented.
Contact Capture
Choose if and when to ask visitors for their contact details during a chat session.
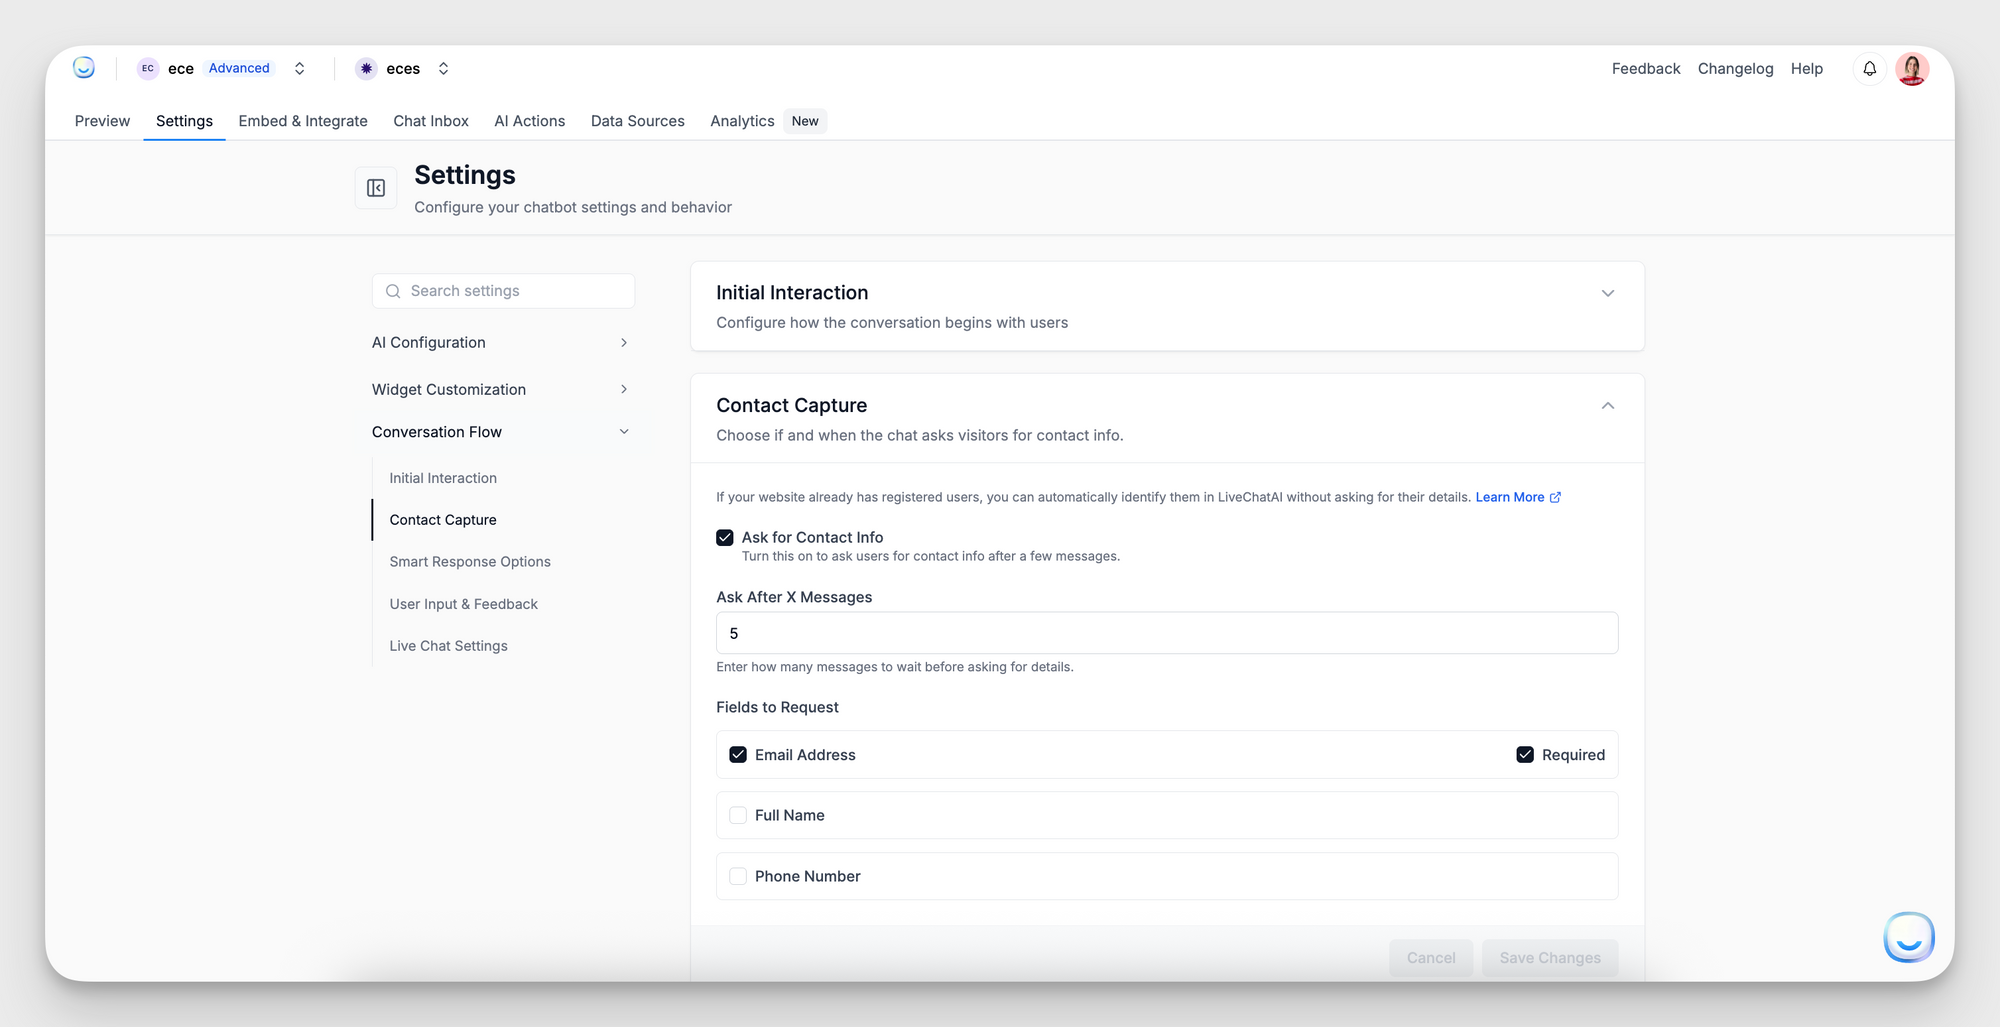
- Ask for Contact Info
- Checkbox: When enabled, the chatbot automatically prompts the user for contact information after a set number of messages.
- Ask After X Messages
- Field: Enter an integer (e.g., 2). After that many AI-generated or user-sent messages, the bot pauses and asks for contact info.
- Recommendation: Set to 1–3 so you capture an email before a deep support issue.
- Fields to Request: Check the boxes beside each field you want to collect:
Full Name
Phone Number
Required: When toggled on, the user cannot skip this field.
Tip: Only request contact info when absolutely needed (e.g., “We’ll send you a follow-up via email”). Too many required fields can frustrate users.
Smart Response Options
Enable or disable intelligent chat features that appear after each AI answer.
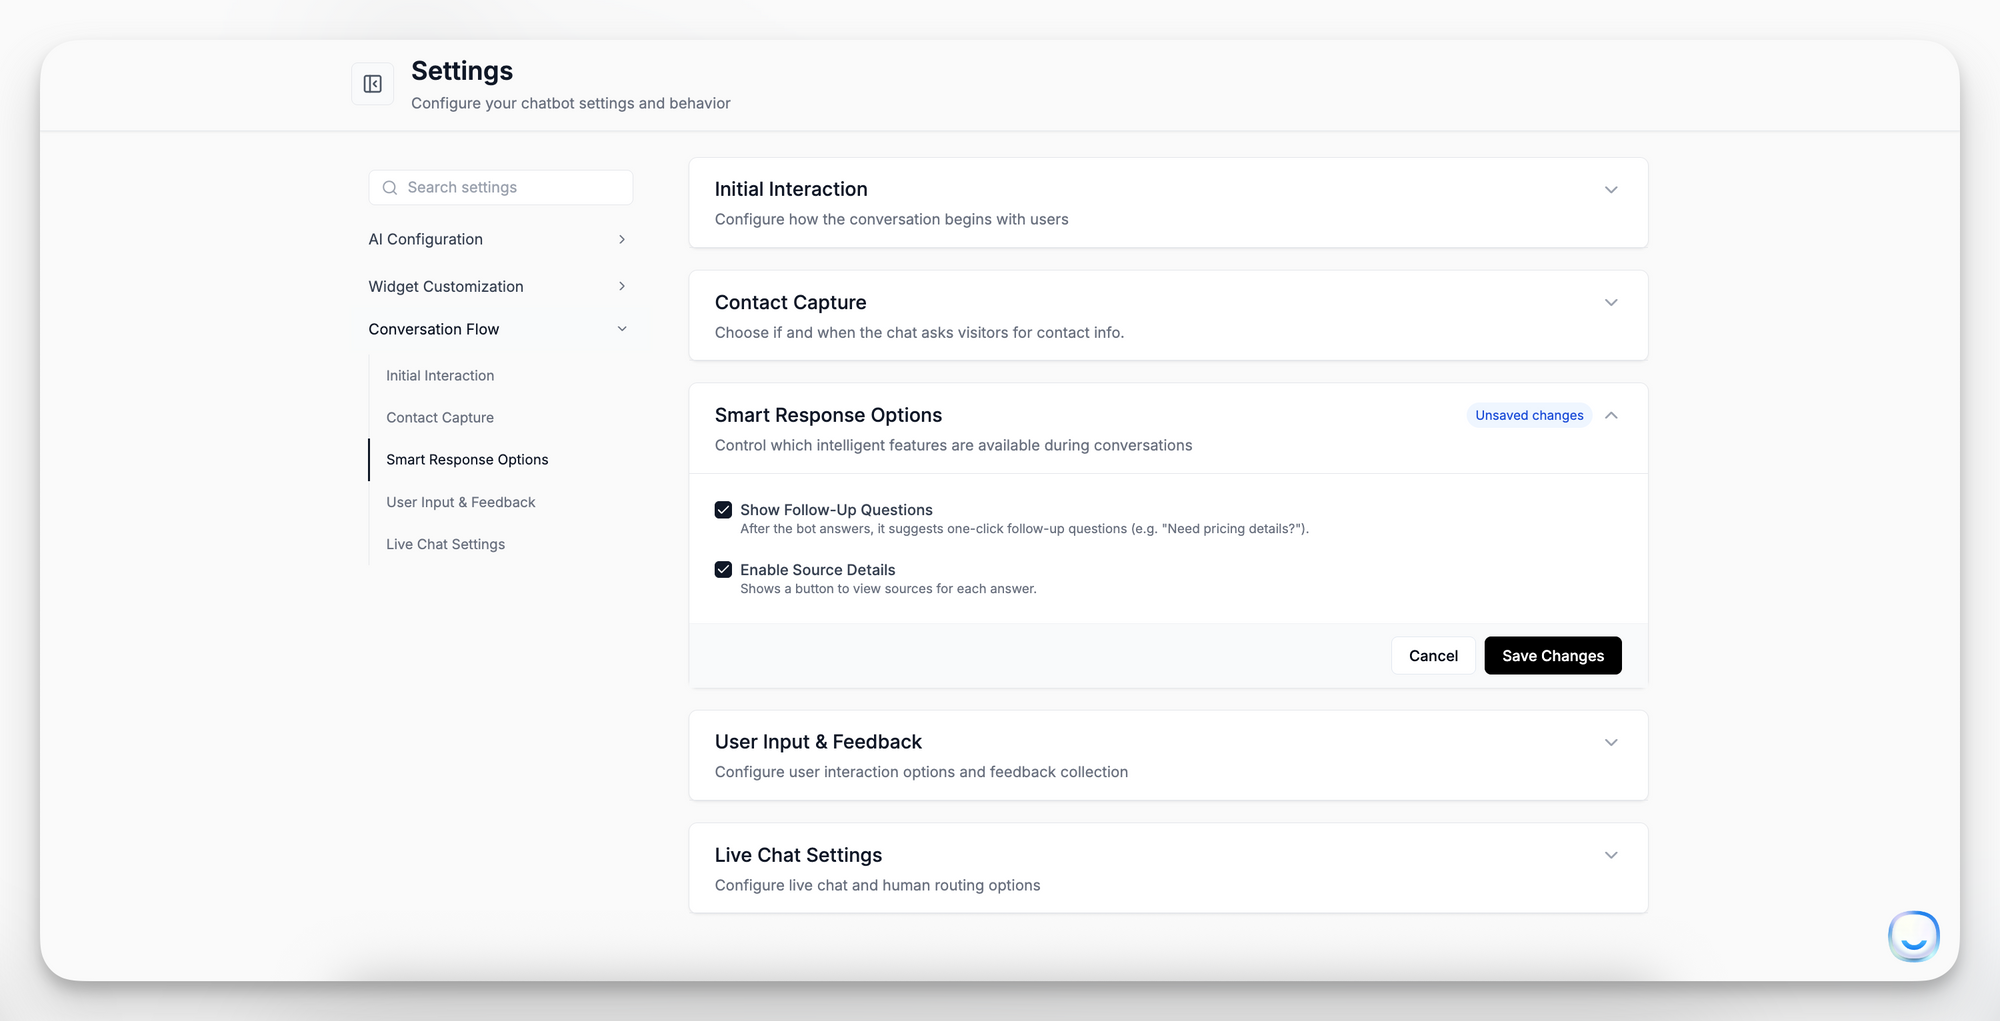
- Show Follow-Up Questions
- Checkbox: When checked, the chatbot displays 1–3 “quick” follow-up suggestions (e.g., “Need pricing details?” or “Want to schedule a demo?”).
- Benefit: Encourages users to dive deeper without typing, guiding them to relevant topics.
- Enable Source Details
- Checkbox: When enabled, a “View Source” button appears under each AI response.
- Function: Clicking “View Source” shows which document, webpage, or Q&A snippet the answer was derived from.
- Use Case: Improves transparency and trust—users can verify where the information came from.
User Input & Feedback
Control how users can interact, including image uploads and feedback collection.
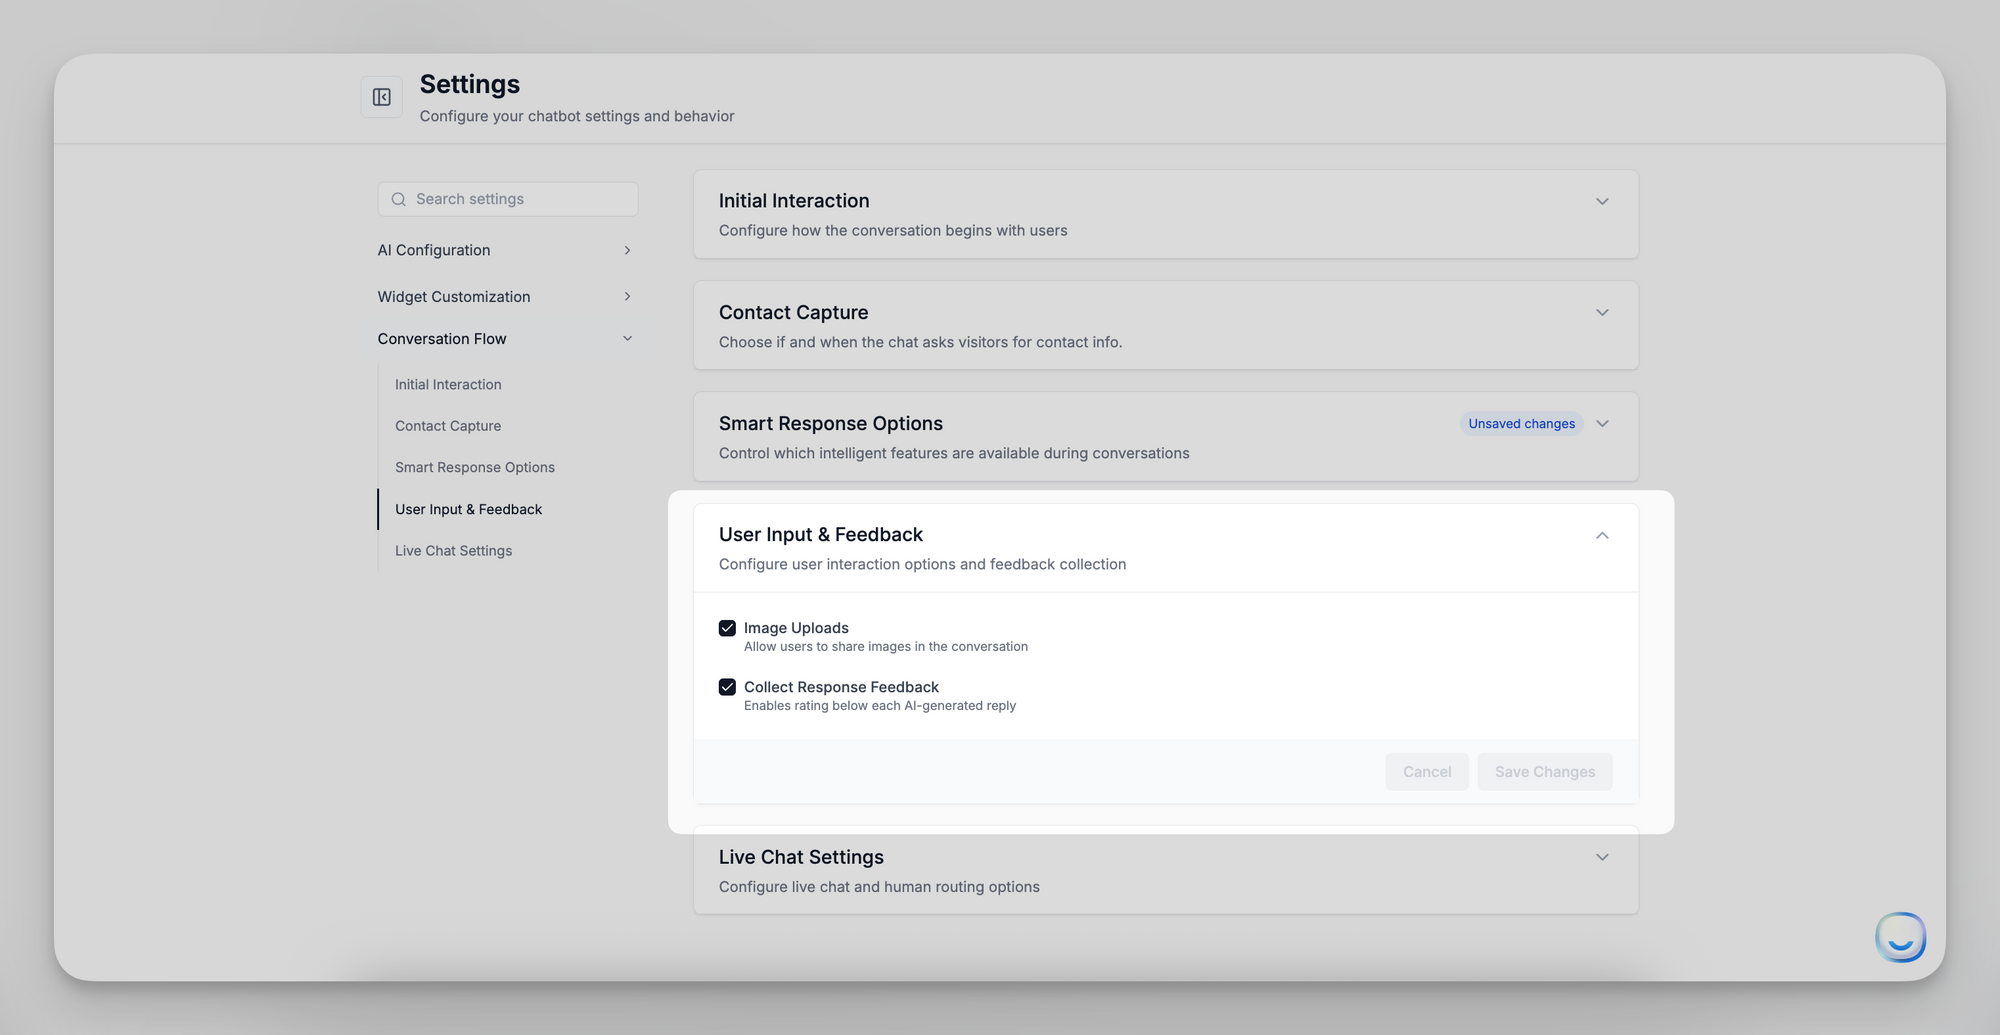
- Image Uploads
- Checkbox: Allow users to attach image files (PNG, JPEG) during a chat.
- Use Case: Helpful for product support when users need to show a screenshot or photo of an issue.
- Collect Response Feedback
- Checkbox: When enabled, each AI-generated response includes a thumbs-up/thumbs-down or star rating UI.
- Benefit: Gathers real-time sentiment—track which answers are helpful and continuously improve training data.,
Live Chat Settings
Configure how and when you route a user from the AI chatbot to a human agent.
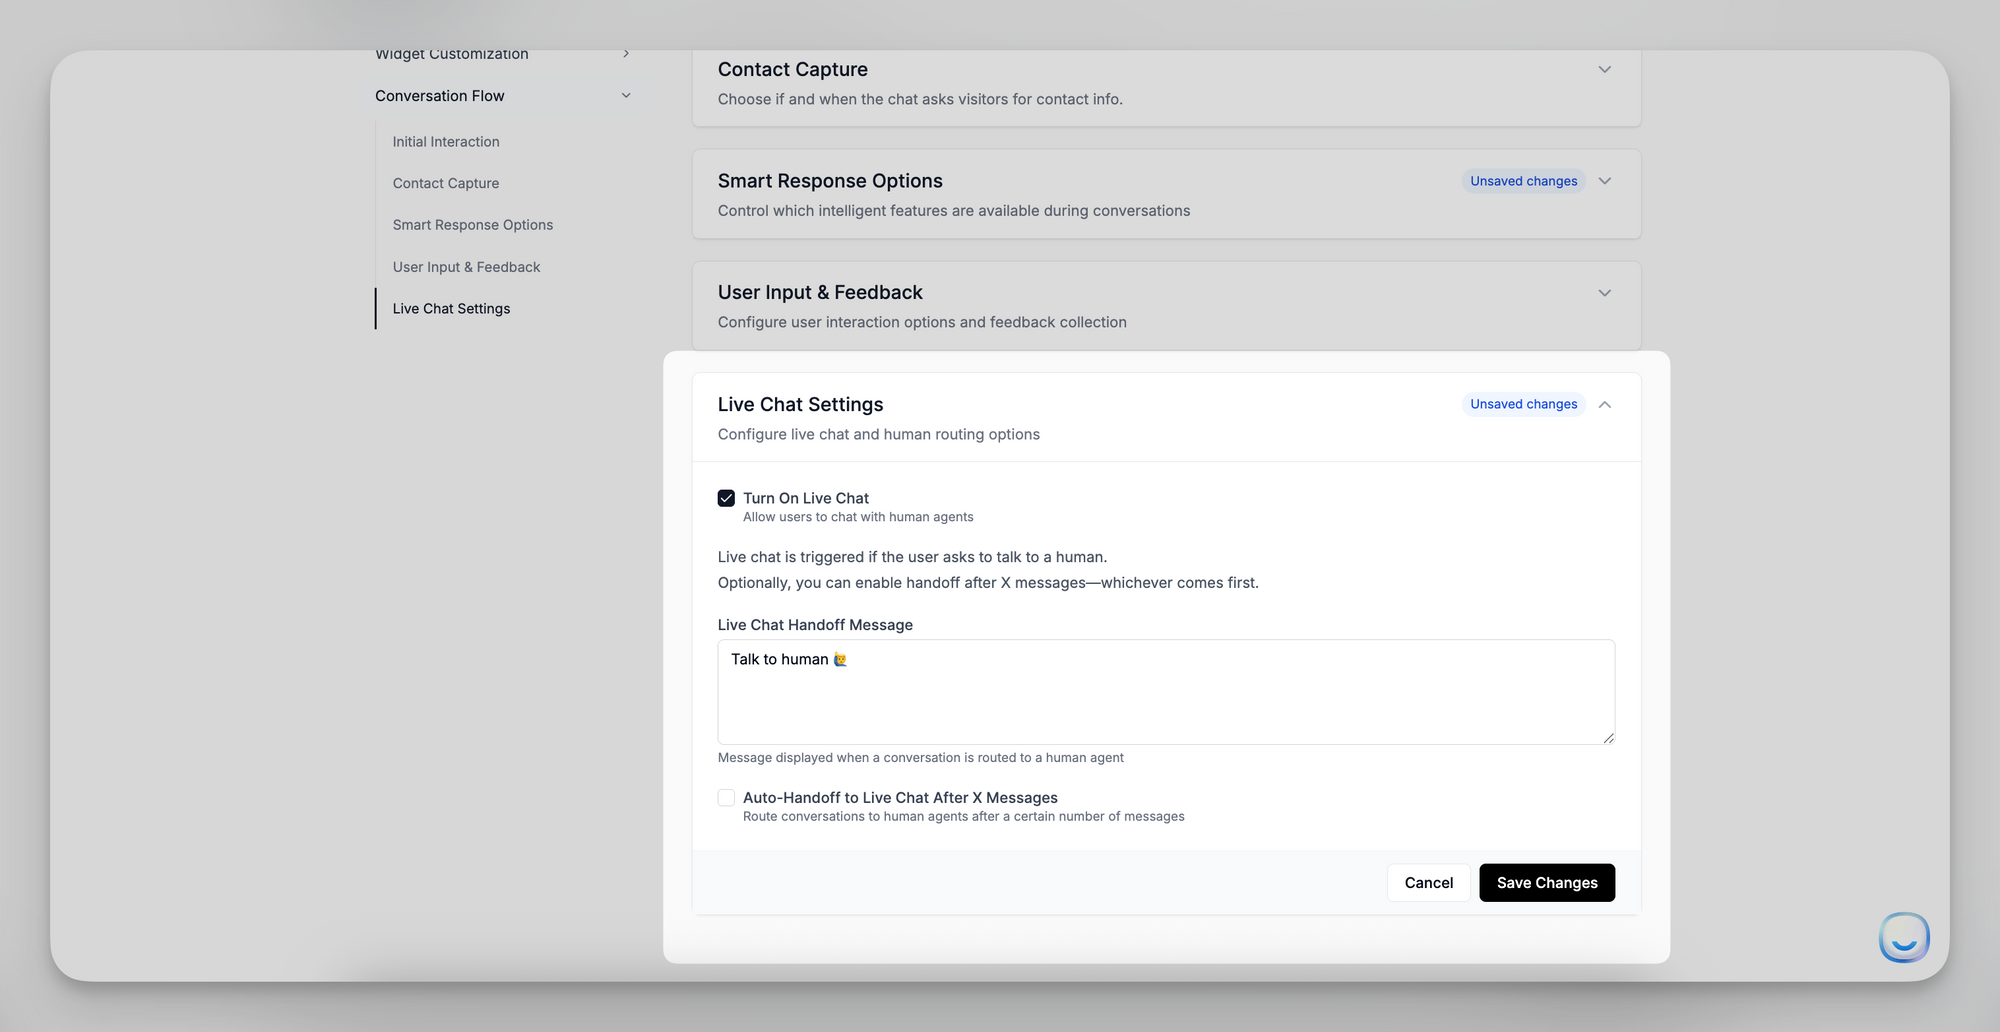
Turn On Live Chat
- Checkbox: When checked, allows visitors to request a human. Live chat is triggered if:
- The user explicitly asks to speak with a human (e.g., “I want to talk to someone”).
- Auto-Handoff to Live Chat After X Messages is enabled.
Live Chat Handoff Message
- Field: Enter the text the bot displays when handing off (e.g., “Connecting you to a live agent now…”).
- Appearance: Immediately after the user indicates “Talk to a human,” this message shows while the handoff occurs.
Auto-Handoff to Live Chat After X Messages
- Checkbox: When enabled, automatically routes a conversation to a human agent after a set number of back-and-forth messages.
- Handoff After X Messages
- Field: Enter the maximum number of AI/user exchanges (e.g., 2 or 3). Once reached, the bot stops and triggers the live chat.
Note: Ensure your support queue or agent notifications are monitored so handoffs happen promptly.
Saving & Testing Your Conversation Flow
- After adjusting any sub-section, click Save Changes within that panel.
- Open your website chat widget (or Preview the full-page chat) to verify that:
- The automatic greeting (or lack thereof) appears as expected.
- Contact info is requested after the correct number of messages.
- Conversation starters display and send the right replies.
- Smart response suggestions and “View Source” buttons behave correctly.
- Users can upload images and rate responses.
- Live chat handoff triggers when configured conditions are met.
For additional help or troubleshooting with Conversation Flow settings, email [email protected].